
Testing hot water heater thermostat is imperative in water heater maintenance as this component regulates the water temperature inside the tank. It will also help you detect common water heater problems.
Where is the thermostat on hot water heater? All modern water heaters consist of two thermostats: the upper and the lower one. The upper thermostat cuts off the heating elements’ power when the temperature limit is reached, while the lower one senses the water’s heat level. So if one of the elements fails, the water heater will not operate properly.
Learning how to test a water heater thermostat is relatively easy. You have to turn off your unit and use a multimeter to read the heating elements. It may seem like a tedious task to start, but I will walk you through the step-by-step process.
Table of Contents
What Will You Need in This Tutorial

First off, you need to know the basics of a water heater thermostat. Now, do all water heaters contain a thermostat? Yes, they do. However, not all of them are universal. There are single-element and dual-element water heater models, which have single and dual thermostats respectively.
As for gas models, a gas heater thermostat is a significant component of the gas valve assembly.
The difference between gas and electric water heaters is that there are no practical means to test the gas valve thermostats other than adjusting the thermostat knob to a warmer temperature. Therefore, you could turn on the nearest faucet and check if it generates the desired warm water.
Nonetheless, whether you have a conventional water heater or not, testing the water heater thermostat is just the same: you have to reset the temperature setpoints as needed and observe the result.
To check hot water heater thermostat for your electric water heater, kindly prepare these tools and supplies :
Digital Multimeter
A multimeter is a piece of electronic test equipment used by electronic technicians/engineers and do-it-yourselfers to diagnose voltage, current, and resistance. But what kind of multimeter do you need in this small-scale project?
The two main categories of multimeters are analog and digital. Between these two, I recommend using a digital multimeter for your electric water heater thermostat test.
You will get more accurate voltage readings with a digital multimeter than with the analog models. Digital multimeters can measure voltage better than their analog counterparts because of their higher resistance of 1 M or 10 M.
Additionally, they are more reliable for a simple thermostat test as they display an instant digital readout. It will also minimize the hassle of reading a swinging needle scale, which often provides reading and interpolation errors.
If you are a first-time electronic hobbyist, using an analog multimeter might be tricky and require a lot of time to master. Consequently, digital multimeters can help you more.
Phillips Screwdriver / Flathead Screwdriver
Phillips head screws are long-established among mechanic products, and you would most likely find Phillips heads in the thermostat wiring connections and access covers. In this task, you have to prepare a #2 Phillips screwdriver to fit into them.
Depending on the type of water heater construction, you may also see flathead screws. In that case, you would need a flathead screwdriver.
Step-by-Step Instructions

When water is not hot enough, an electric water heater thermostat troubleshooting is our last resort. While it sounds too technical for most homeowners to understand, the good news is that you do not need to be tech-savvy to do it.
Let’s dive into the easy-to-follow steps :
Procedure 1: Initial Preparation Of Tools And Water Heater
- Step 1: Switch off the power supply of your electric water heater.
Turn off the circuit breaker that connects to your unit at the electric service panel. As a general rule, it is a must to turn off any appliances before maintenance to prevent an electrical hazard.
Pro Tip: Don’t forget to wear safety gloves and shoes for mechanical protection against electric shocks.
- Step 2: Detach the access panels from the tank.
You can use a Phillips (or flathead) screwdriver to unlock the screws. The thermostats and their heating elements can be found underneath. If your unit has a plastic insulation cover and a flap, get them out of the way so that no wires can get caught up.
- Step 3: Check if you’ve properly deactivated the power supply of your water heater.
You have to double-check the water heater to see if it still has access to electricity. You can do it by turning your multimeter dial to the lowest setting for ohms of resistance or resistance with tone (if your digital multimeter has this feature ).
Hold one multimeter probe against the ground metal (unpainted tank), then touch the remaining probe to each of the thermostat terminals and heating element terminals. The multimeter should have a voltage reading of 0 (zer0).
It means that there is no power circulating your unit. If you get this value, you can continue the rest of the thermostat test.
Pro Tip: I highly recommend using a non-contact voltage tester when double-checking the power supply of the electric water heater. This specialized tool allows you to check for the voltage in wires/devices without having to make direct contact with the electrical connections.
These testers also light up when they detect a minimal amount of current. Therefore, they reduce the risk of electrocution.
- Step 4: Arrange the settings of your multimeter.
There are two probes colored red and black in a multimeter, and you should always plug the black probe into the “COM” jack. Then, insert the red probe into the voltage jack that is labeled “VΩ”.
Lastly, set your multimeter to resistance mode (labeled as ΩnS) and select the range which is compatible with the thermostat resistance (ohms) rating of your water heater.
If you don’t know the exact ohms of your thermostat, set it to a higher range where you think the best readings can be observed.
If you’re confused about which value you should use, you may consider using a multimeter with an auto-range feature to generate a more accurate number automatically.
Pro Tip: You should visually inspect the multimeter. Make sure that the meter, test probes, and accessories don’t have signs of physical damage. The test leads should have no exposed conductors and should be plugged snugly into the corresponding ports to avoid electric shocks.
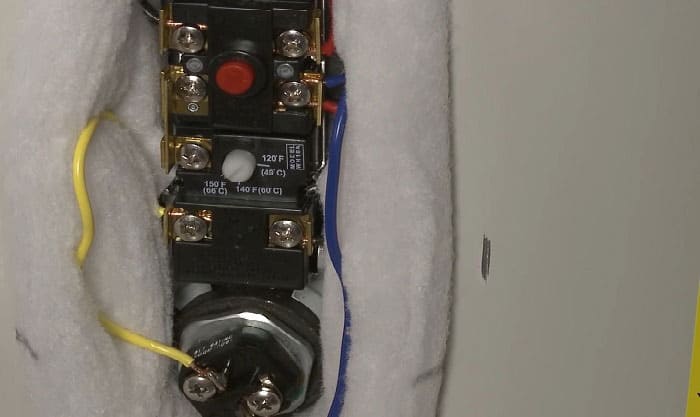
- Step 5: Prepare the thermostats
Reset the reset button of your water heater if it tripped. It is usually red and located in the upper thermostat, but you may also find a lower thermostat reset button. If so, push it as well.
If the reset button tripped, it means that you may have a problem with one of these components of the water heater :
- The thermostat contacts fusing closed
- Faulty/shorted heating element
- Loss of thermostat calibration
You may now disconnect the thermostats by removing the electrical wires. Use the Phillips screwdriver to separate the wires from the terminal of each thermostat.
Pro Tip: You can take a photo of the wiring orientation to help you reconnect the wires later on.
Procedure 2: Testing Thermostat Continuity
- Step 1: Test the electric water heater thermostats with a multimeter
Now that the tools are readily available, it’s time to test the continuity of the thermostats. First, you have to make sure that the upper thermostat is working efficiently.
Touch one multimeter probe to the reset terminal. It is usually located near the red-colored reset button. An upper heating element may have two to four electrical terminals, and the reset terminal that you need to find is the wireless one.
Next, take the other multimeter probe and place it on the left side terminal. It is a portion that holds an incoming electrical wire.
Look for the generated data in the digital multimeter. The LCD reading should only show “0” or close to zero, as in “0.001.” If your multimeter shows a different reading, your thermostat could be failing already, and you will need to replace the thermostat soon.
Finally, reconnect the previous probe (second) to the right side terminal without displacing the first probe. Take note of the result, and don’t forget that the only functional value is zero (with continuity).
- Step 2: Examine the temperature of your water heater
Place one multimeter probe against the left common terminal of the thermostat & the second one on the terminal of the upper heating element. If the dial shows a 0.00 number & a “1” later, it indicates that your unit produces hot water at a lower temperature than the predetermined temperature.
Second, with the first probe on the common terminal, insert the second probe on the lower heating element. If you get a reading of 1.00 first, it means that the hot water in your water heater is higher than the preset temperature. Do the same steps with the lower thermostat.
- Step 3: Compare the reading results and adjust the thermostat settings.
The upper thermostat and the lower thermostat should have the same value. Getting different outcomes means that one of the two is defective.
Lastly, don’t forget to adjust the thermostat. If the result is 1.00, turn the dial to the left to reduce the temperature and do the opposite if you get the 0.o value. You can check out this video or click this link to learn more how to adjust your water heater temperature in 6 simple steps.
Conclusion
If the temperature of your residential water changes erratically, a faulty thermostat might be the culprit. Checking the thermostat on the water heater can ease your worries, as you can know why it’s malfunctioning.
Now that you have learned how to test a water heater thermostat, you could now determine whenever your thermostat needs replacement or adjustment.
I hope you enjoyed the tutorial! For any comments or suggestions, fill in the comment box below.

I am Natalie Bridges. You can call me Nat. I am the content creator of Saveourh2o. My main job is researching common concerns you need help with, and about your home’s water system. I aspire to incorporate Ronald’s experiences, and customers’ feedback on different products, as well as expert’s advice to offer you the most informative content.